![Easily Shift From Blogger To WordPress [No Traffic Loss]](https://lh3.googleusercontent.com/blogger_img_proxy/AEn0k_u3eUWGIRr8fwwNkkjIbFZj7dt1RSNs2_BjL6DeW-bLdLfgxbtzNN63KhLTS-v4XFZBb_m_Rn9J7RX4CZFe7sap1cJfS6ZCyFSQTiPNUB1AKsybS1qJq0Yg0y0I0SXSPb2-V0ytdx9Yud_mpChj-3kViaVtjkF6BRj9wwouLET5cYoRAgLmMbQxBT4CG1k=w680)
In this article, I am going to share with you the same steps that I performed when I migrated my site from Blogger (Blogspot) to WordPress while keeping my organic rankings safe. So come, let me hold your hand and guide you through the process of shifting from Blogger to WordPress in an easy to follow manner.
Note: I got to know that there are a lot of people who have this question in mind: “Can we move from Blogger to WordPress?”. If you too are wondering the same, well let me answer it for you, “Of course, we can! Just keep reading this article! 🙂 “.
This tutorial might be a little longer than the typical ones you would find on the internet, but that’s because it doesn’t leave a single stone unturned and ensures you the perfect Blogger to WordPress migration! 🙂
When I first started this site, I had hosted it on Blogger. That’s what every new blogger does as Blogger provides free and reliable hosting with robust security and allows us to customize our blog however we want. However, we soon realise that there are certain technical and SEO limitations of Blogger which can hold our blog/website back against our competitors who use the self-hosted WordPress platform.
When Is The Right Time To Make The Shift?

To use the WordPress platform for your website, we need to get a hosting service for our site. Even though there are plenty of free hosting services available, but no one serious about his/her website goes for the free hosting as those are extremely unreliable, slow and have poor uptimes.
So, the point is that on Blogger we just need to pay a yearly fee for the domain. But on WordPress, we would also have to pay for the hosting.
Thus, I would recommend you to make the switch from Blogger to WordPress, only when you start getting a decent amount of traffic and make a decent income from your blog.
Now let’s jump into the tutorial to learn how to move your site from Blogger to WordPress.
Main Focuses While Shifting From Blogger To WordPress
These will be our main objectives while moving our site from Blogger to WordPress:
- Transfer all the posts, pages, images and comments from Blogger to WordPress.
- Setup redirects to the new permalinks so that SEO remains preserved. This step makes sure that your organic rankings remain safe and the user never gets a 404 error.
- Redirect your RSS feed.
- Make sure that all your traffic reaches your new version of the site safely, without startles.
- Transfer all the images from Blogger’s hosting to your new WordPress hosting.
- Setup a good theme for your blog and install essential plugins.
- Clean up the unnecessary mess (plugins).
Steps To Shift Your Blog From Blogger To WordPress
STEP 1: Get A Good Hosting And Install WordPress In It

This is going to be the most important part of your WordPress site. You should never ever compromise on the hosting of your website. Never go for low-cost hosting services as then you will suffer from slow loading speeds and unacceptable server downtimes, which in turn will affect your site’s SEO very badly.
I use SiteGround hosting for all my WordPress sites. It simply is the best. It’s a bit on the expensive side but if consider the quality of service that it offers, it’s totally worth the money.
Below are the hosting services that I would personally recommend:
#1: SiteGround (MOST RECOMMENDED): Simply the best. On my sites to date, I have personally got 100% uptime from SiteGround (USA Server), even though they guarantee 99.99% uptime.
Their user interface is very intuitive for beginners as it replaces the complex usual cPanel look with its own curated minimal look.
The best part of SiteGround is its amazing customer support. You will have the option to live chat with them in case you have any issues with your site. I have to say that they are very well trained and are extremely quick at responding.
It also provides free and quick WordPress installation, free SSL and CDN, free e-mail hosting and free daily backups (HUGE BENEFIT, LIFE-SAVING FEATURE) on all its plans. Its Siteground SG Optimizer plugin is a cherry on the cake.
Recently SiteGround has partnered with Google Cloud Platform for even better performance, reliability and security. Sites hosted on SiteGround shall be detected as hosted on Google Cloud Platform for the same reason.
It is also officially recommended by WordPress
You will find the plans chart on their site. Choose the appropriate plan depending on the amount of traffic your site gets.
#2: DreamHost: The second best. This a great and a cheaper alternative to SiteGround.
It does not provide e-mail hosting in its base plan. But overall, a solid hosting service in terms of server uptime, speed and performance. This one is also officially recommended by WordPress.
I would like to put a bit more stress on their security. It’s amazing.
#3: Bluehost: This was the best hosting provider once upon a time. But things have changed for the worse after EIG took over the company.
Although it is also officially recommended by WordPress, SiteGround and DreamHost are no doubt way better than this one.
Bluehost provides free domain for 1 year with their hosting plans, so that’s a plus point. This also means that you won’t have to change the nameservers of your domain manually in order to be connected to your WordPress site, Bluehost will do that automatically for you.
#4: NameCheap’s EasyWP: I have never used their hosting. However, their hosting is extremely affordable and makes me wonder how does this company provide so much for so little money.
A friend of mine uses this hosting service and according to him, it’s a great hosting provider and delivers everything that it promises. That is a great performance and server uptime at a super affordable rate. So, I would recommend this for the ones who are at a tight budget.
One negative point of EasyWP is that your domain needs to be registered with NameCheap in order to be used with EasyWP.
If you already had a custom domain setup on Blogger, register your hosting account with the same custom domain. Otherwise buy a new custom domain. I would recommend Google Domains or NameCheap for buying domains.
Install WordPress on the host and perform the initial setup. The initial setup consists of typing in your site’s name, tagline, your login-id and password.
Your site’s WordPress dashboard should be available at [yourdomain.com]/wp-admin.
Login to your dashboard using the login-id and password.
STEP 2: Configure Your Domain With The Host

If you were using a custom domain on Blogger, you will now need to point that domain to your new WordPress host.
To do that, simply go to the site from where you purchased your domain. You will find the option to change the nameservers of your domain under the DNS settings.
As the process of changing the nameservers is not the same for every domain registrar out there, so kindly do a web search “how to change nameservers in (the name of your domain registrar)“, and follow the procedure.
After changing the nameservers, you may have to wait up to 30 mins for the changes to take place and your site is accessible. In some rare cases, it may take even longer.
If you were not using a custom domain in Blogger and were using a subdomain of .blogspot.com, then you will have to perform this step after purchasing a new domain.
But if the host with whom you signed up is providing you with a free domain, then you can skip this step entirely as they will take care of it for you, automatically.
STEP 3: Export Your Blog From Blogger
Now login to your Blogger account.
Then go to Settings -> Other -> Back up content.
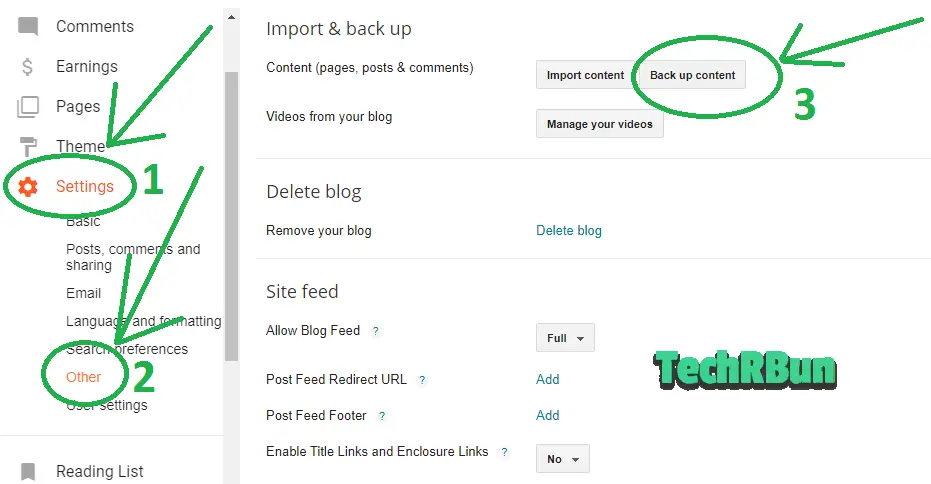
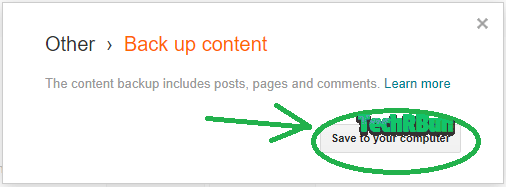
Click on Save to your computer.
STEP 4: Import Your Blog To WordPress
Now login to your WordPress dashboard by going to [yourdomain.com]/wp-admin and type in your e-mail id and password that you registered using your hosting site after installing WordPress in it.
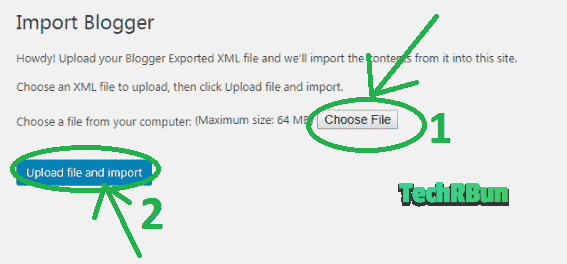
Once logged in to the dashboard, go to Tools -> Import. Install Blogger from the list.

Then choose the file that you exported from Blogger and downloaded to your computer. Wait for the file to load completely. After that, click on Upload file and import.
In most cases, this process should work flawlessly.
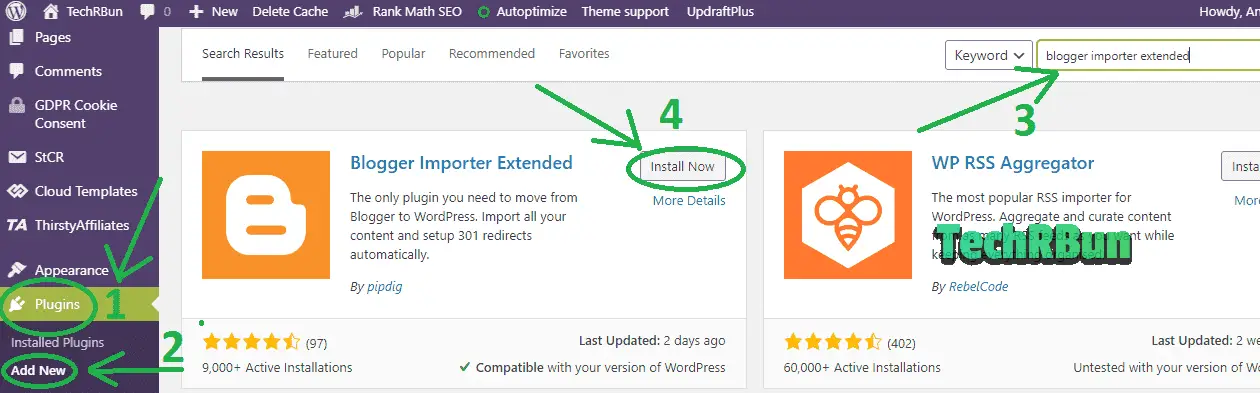
However, if your blog is too big, containing hundreds of posts and this process shows you an error, then you will have to use the Blogger Importer Extended Plugin.
Thus, if the above method fails for you, then follow these steps:
From the WordPress dashboard, go to Plugins -> Add New and search for Blogger Importer Extended. Install and activate the plugin.
After activating the plugin, go to Tools -> Import and select pipdig WordPress Migrator. Then click on Run Importer.
Now click on Connect To Blogger and login using your Blogger account. Finally, select your blog from the list.
Please be patient as this plugin works a little slow, but it will get the job done 🙂
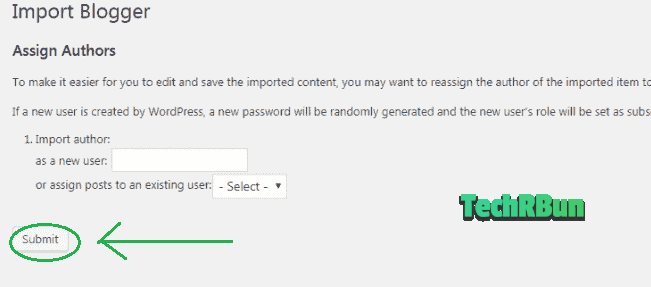
STEP 5: Assign An Author After Shifting The Articles From Blogger to WordPress
Now you need to assign an author to all the posts that you imported from Blogger to WordPress. You can either choose to create a new author to be assigned to these posts or use the same profile that you created inside your hosting site (and that you’re using). Then, click on Submit.
STEP 6: Transfer The Images From Blogger’s Server To Your WordPress Server
After importing the posts, the images still stay on Blogger’s server and they’re simply embedded into your articles. Now we’ll have to transfer all those external images into our own server so that they can be served faster and remain safe even if Blogger decides to delete them from their side.
To transfer the images, follow these steps:
Go to Plugins -> Add New and search for Auto Upload Images. Install and Activate the plugin.
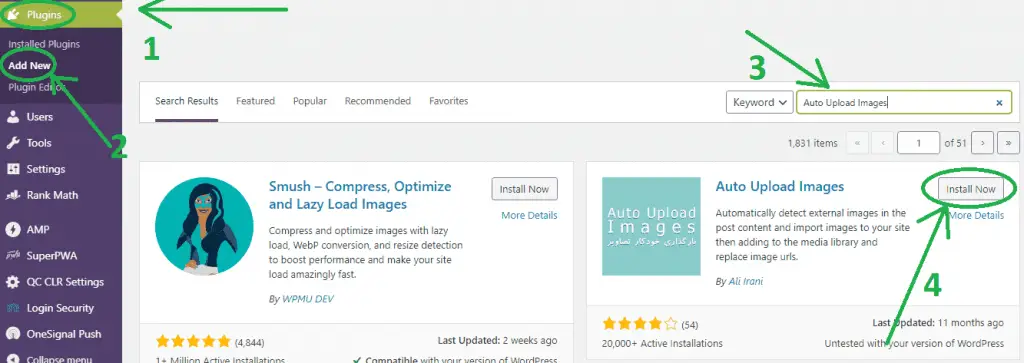
This plugin will find all the images in your articles that come from external sources (as Blogger shall now be treated as an external source after migrating to WordPress) and download them to your own WordPress server. After that, it will replace all those external images in your articles with the ones downloaded in your server.
After installing the plugin, you need to update all the articles once so that the plugin can do its magic and replace those images. But if you have a ton of posts, the plugin might crash. So, the best way to do this is, select 10-20 posts at once, from the bulk options, click on edit and apply and then click on update without making any actual edits.
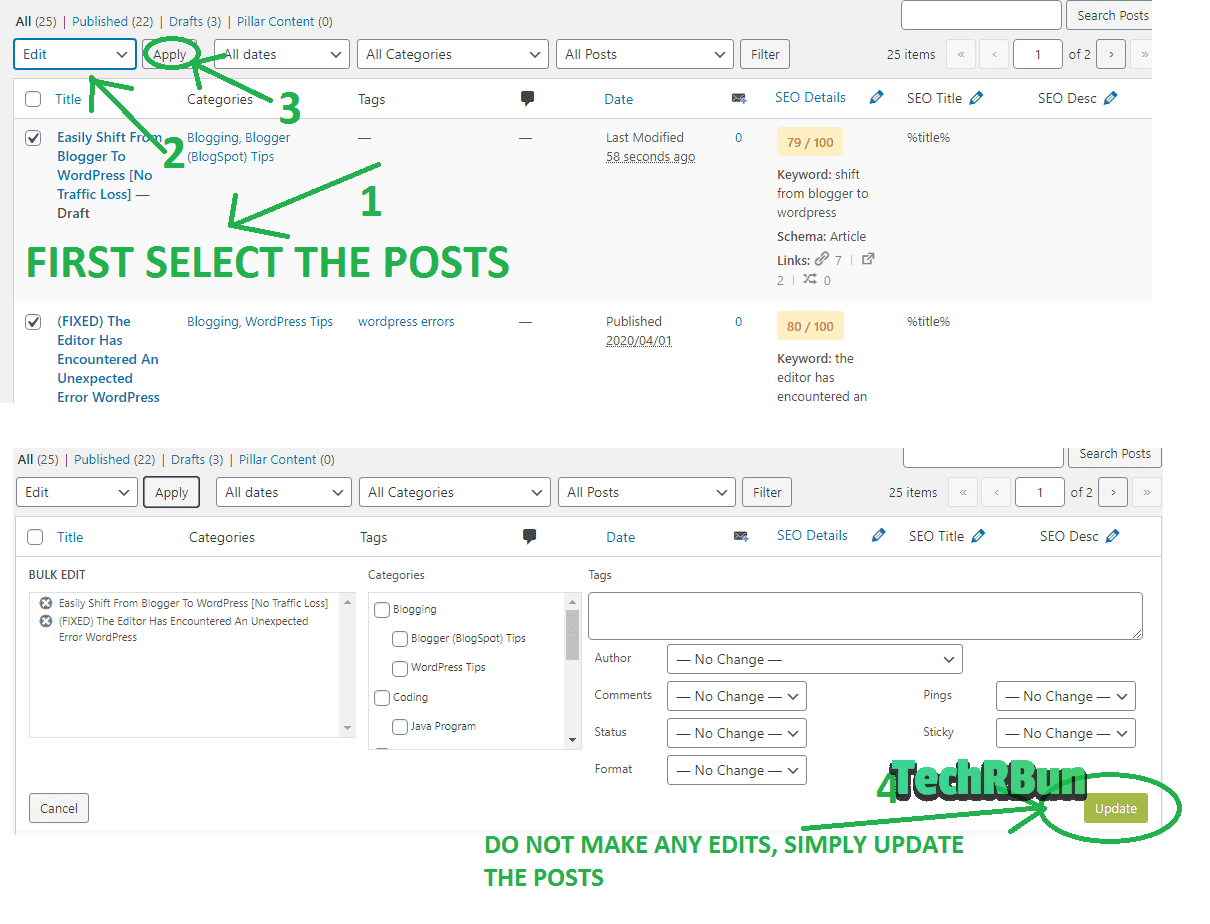
This process will take some time and the articles will take longer time to get updated.
STEP 7: Setup The Permalink Structure And Redirection
One cool feature of WordPress is that it allows you to structure your URLs however you want. Now you can get rid of those lengthy ugly URLs with year, month and .html concatenated to it.
I know, some of you might have a doubt that if we change the URL structure of our posts, won’t our the old links to our articles throw 404 errors? Won’t it hurt my SEO and drop my rankings?
Well, don’t worry! I have got you covered. I have a smart redirection solution that will take care of all these issues and trust me, your site will never throw 404 errors.
But before we come to that magical redirection part, let’s first discuss the permalink structure.
Follow these steps:
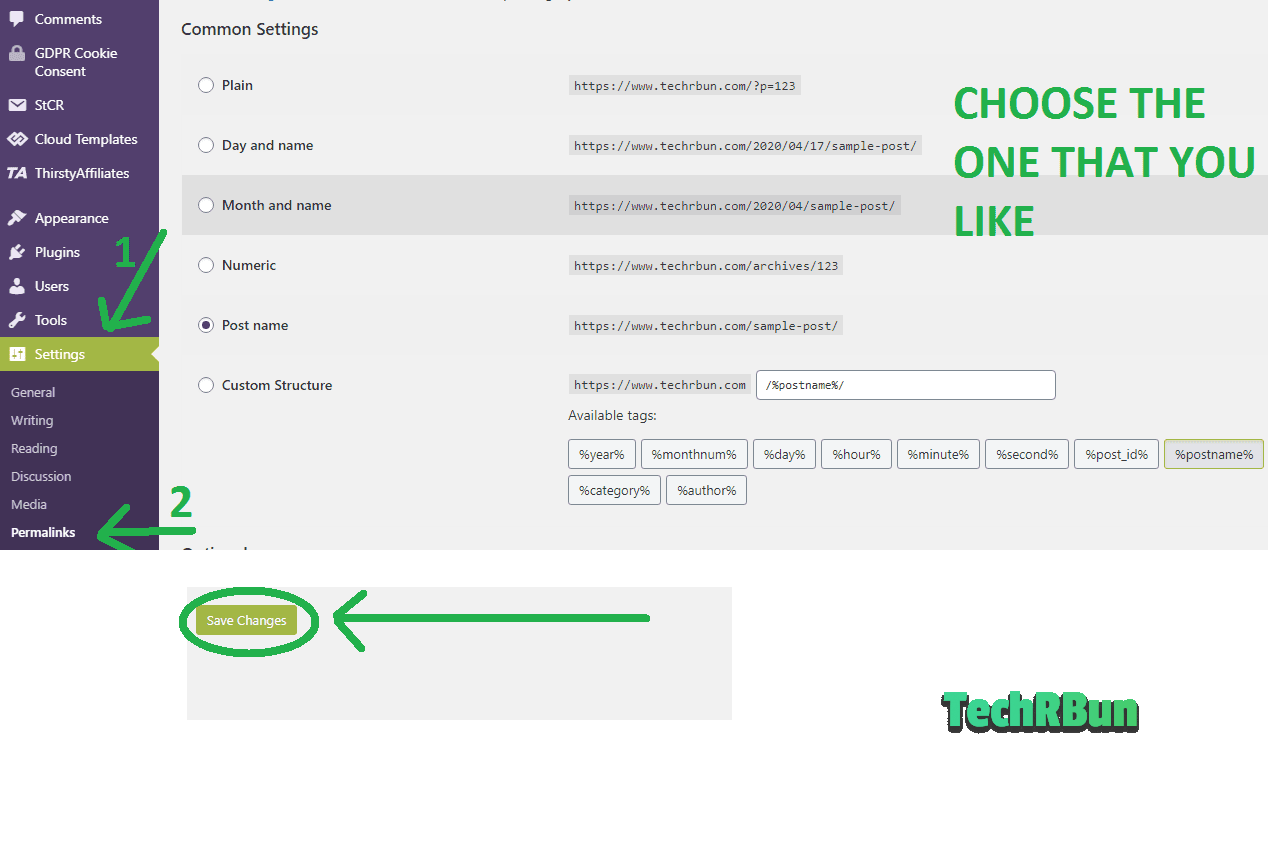
Go to Settings -> Permalinks.
I would recommend you to go with the Post name structure as short and sweet URLs are the best for SEO.
You may also go with the Month and name option or the Day and name option if you’re making a news site.
BUT DON’T CHOOSE THE Plain/Numeric OPTION. OTHERWISE, YOUR SEO WILL BE COMPLETELY DESTROYED AFTER MAKING THE SHIFT.
Now let’s come to the redirection part.
First of all, we need to ensure that the “main part” of URL i.e. the part which comes after the date and before .html portion of the Blogger’s URL, matches with that of the URLs of the posts imported to WordPress.
Although this is supposed to be automatically handled by the Blogger to WordPress importer plugin, sometimes the plugin might do something faulty and so it’s the best to manually double-check each and every URL, whether or not the “main part” is identical or not.
So basically, if the Blogger URL of the article was: https://www.example.com/2020/04/sample-article.html/,
then the WordPress URL of that article should be https://www.example.com/sample-article/ if you had chosen Post name as the permalink structure. Please verify this for all the articles and if you find the “main part” of some of the articles to be different, make sure you correct the WordPress version of those articles and make them similar to the Blogger URL.
NOTE: YOU DO NOT NEED TO ADD THE DATES AND .HTML. OUR MAGICAL REDIRECTION PLUGIN WILL HANDLE IT.
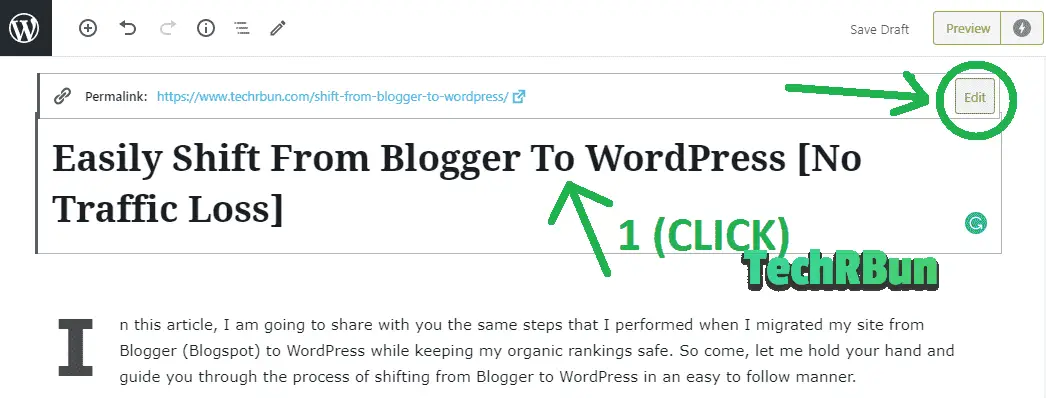
To change the URLs’ main part and make it similar to Blogger URL, simply open the post which has the non-matching URL, click on the title of the post and select Edit Permalink and change it to match exactly with the “main part” of the URL as it was on Blogger.
After verifying and fixing all the permalinks that the importer plugin might have missed out, now it’s time to handle two more issues:
Issue #1: Blogger URLs contain the date and .html appended. We need to make sure that these two substrings get trimmed out of the URL through proper redirection so that neither Google nor any of our readers have to face any 404 error.
Issue #2: When opened on mobile devices, Blogger appends the ?m=1 parameter at the end of the URL and this is recorded by Google. So we need to make sure that this parameter too gets trimmed out with the help of redirection.
But no worries, there’s a single plugin which will handle both these problems and make your WordPress site 404 error proof!
So now, follow these steps:
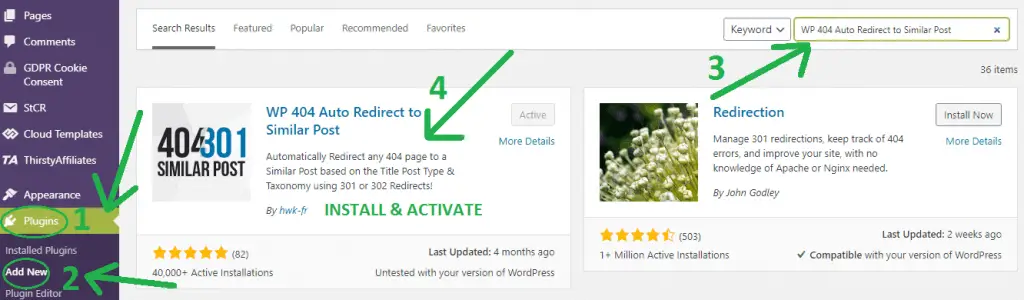
Go to Plugins -> Add New and search for WP 404 Auto Redirect to Similar Post. Install and Activate the plugin.
That’s it! You’ve successfully handled everything regarding the redirection of the URLs. Now all your organic rankings are safe, and your blog is 404 proof!
STEP 8: Managing The Redirection At Blogger’s Side
If you were using a custom domain on Blogger, skip this step.
If you were operating your Blog on a subdomain of .blogspot.com, then you need to program Blogger to forward any incoming traffic to your new website URL.
Follow these steps:
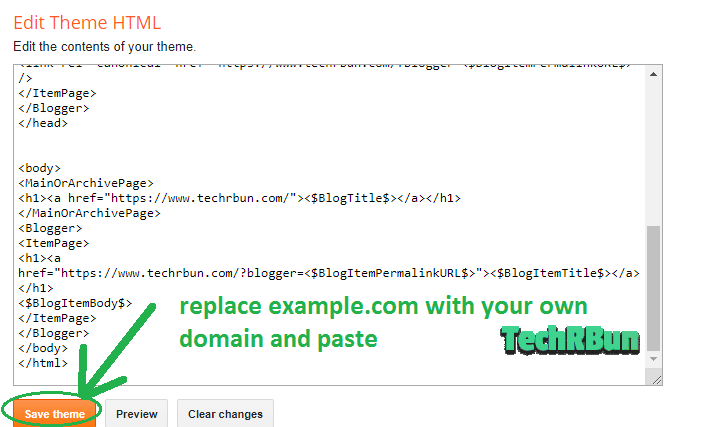
Go to Blogger -> Themes. Scroll down and click on Revert to classic themes.
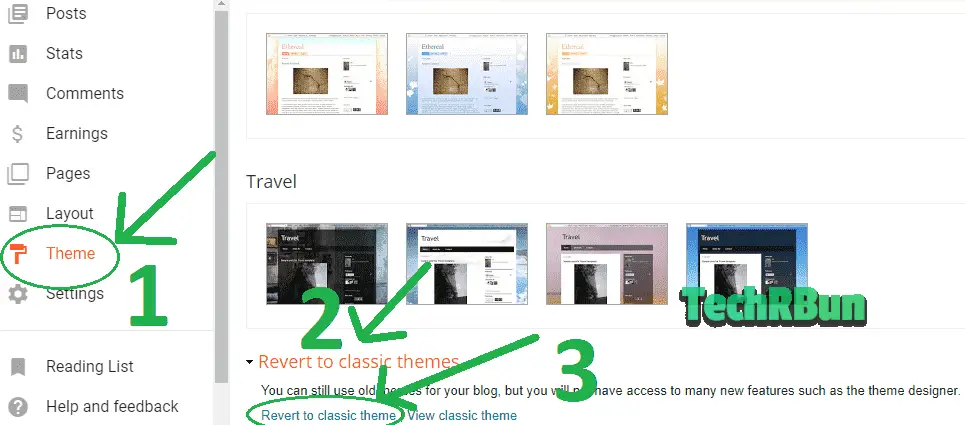
Select all that’s inside the HTML box and delete it. Now paste the code given below into Blogger’s HTML box, change every instance of www.example.com with your actual domain and then, click on Save theme.
<html>
<head>
<title><$BlogPageTitle$></title>


<script>
<MainOrArchivePage>
window.location.href="https://www.example.com/";
</MainOrArchivePage>
<Blogger>
<ItemPage>
window.location.href="https://www.example.com/?blogger=<$BlogItemPermalinkURL$>"
</ItemPage>
</Blogger>
</script>


<MainPage>
<link rel="canonical" href="https://www.example.com/" />
</MainPage>


<Blogger>
<ItemPage>
<link rel="canonical" href="https://www.example.com/?blogger=<$BlogItemPermalinkURL$>"
/>
</ItemPage>
</Blogger>
</head>


<body>
<MainOrArchivePage>
<h1><a href="https://www.example.com/"><$BlogTitle$></a></h1>
</MainOrArchivePage>
<Blogger>
<ItemPage>
<h1><a
href="https://www.example.com/?blogger=<$BlogItemPermalinkURL$>"><$BlogItemTitle$></a></h1>
<$BlogItemBody$>
</ItemPage>
</Blogger>
</body>
</html>
STEP 9: Redirect Your RSS Feed
If you do not use RSS Feed, skip this part.
If you had RSS Feed and had users subscribed to it, then follow these steps:
Go to Blogger -> Settings -> Other -> Post Feed Redirect URL and add https://www.example.com/feed/ (replace example.com with your actual domain.)
STEP 10: Get Rid Of The Unnecessary Plugins
Now you can go ahead and delete the following plugins and make your site lighter:
- Blogger Importer
- Blogger Importer Extended
- Auto Upload Images
They’ve already served their purpose and are no longer required!
That’s It! Done!


Post a Comment