
There are so many websites on the Internet that look pretty much the same. The good news is that if you’re using WordPress, you’ll be able to customize the appearance of your theme and personalize it by tweaking its style sheets.
There are many ways you can modify your site’s CSS. And in this post, we’ll show you four different ways to customize your WordPress site’s CSS – using the built-in theme customizer, editing your theme’s style.css file, using a plugin, and child themes. We’ll also go over the key benefits of each approach so you can decide which method to go with.
By the time you’re done reading this post, you’ll be in a better position to customize your site without worrying about breaking it.
Let’s begin.
CSS AND HOW IT WORKS
Before you can start customizing your WordPress theme, let’s go over some CSS basics. Cascading Style Sheets (CSS) is a design language that controls how corresponding HTML elements are displayed on the screen.
CSS controls things like the color of text, font styles, background colors, border thickness, margins etc., and makes web pages look presentable. The first website ever created doesn’t have any CSS – it’s purely HTML.
The cascading part in cascading style sheets allows web designers to make global changes to their websites simply by changing its CSS. Stylesheets have rankings. Changes made to higher-ranked stylesheets override all of the stylesheets that have a lower ranking. And it’s because of this feature that you’re able to create a separate stylesheet in your child theme that affects how your site’s front-end looks. Simply put, it allows you to update a CSS file without editing the original stylesheet of the theme.
HOW TO IDENTIFY A CSS SELECTOR
CSS allows you to apply styles to the HTML that defines the structure of the web page. The first step is to decide which part of your theme you want to modify. Once you’ve done that, you’ll have to find out the CSS selector corresponding to that particular element. Popular web browsers allow you to identify a page element’s CSS selectors and declarations using an inspect tool.
Here’s how you can find an element’s CSS selector using Chrome:
Step 1: Right-click on the page element you want to modify, and select Inspect Element from the drop-down that appears. (If you are using Firefox, highlight a specific portion of the page, right-click on it, and then select Inspect Element from the list that appears.)
Step 2: You should see two split screens appear in your browser. On the right, you will see the design information which gives you information about the web page’s HTML and CSS. And on the left, you can preview the web page.
Step 3: You will see the page element’s CSS selector displayed first in the list. Copy it into your clipboard.
By default, the CSS styles for a theme are stored in the style.css file. One way to add custom CSS to your WordPress website is to use a text editor to open up your theme’s style.css file, modify it, and then use an FTP client to upload it to your theme’s directory.
If that sounds complicated or if you don’t have an FTP client set up for accessing your site’s files then there’s no need to worry. In the next section, we’ll step through four (easier) ways of adding custom CSS to your WordPress site.
HOW TO CUSTOMIZE YOUR WORDPRESS WEBSITE WITH CSS
Now that you have a firm grasp of the basics of CSS, let’s take a look at some of the ways you can add custom CSS to your WordPress website. We’ll demonstrate by using the default Twenty Seventeen theme.
METHOD 1: WORDPRESS THEME CUSTOMIZER
The WordPress theme customizer is the easiest (and fastest) way to modify your website’s CSS. Its What You See Is What You Get (WYSIWYG) interface lets you mess around with theme settings, customize colors, menus, widgets, etc. You can also add custom CSS code using the theme customizer. Here’s how:
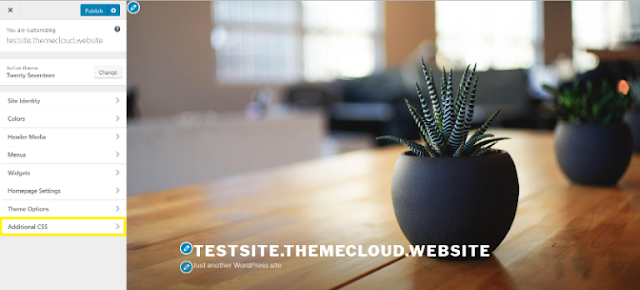
To get to the WordPress theme customizer navigate to Appearance > Customize from the WordPress admin panel. You will be redirected to the customizer interface, with the customizer’s menu on the left and your site’s front-end preview to the right. From there, click on the Additional CSS menu item.
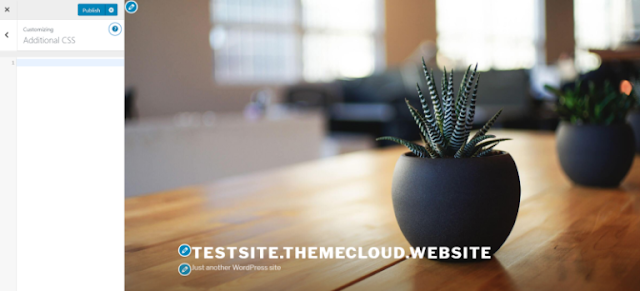
A textbox will appear in which you can enter your custom CSS code. So, for instance, if you come across a code snippet on the Internet and it says, “Just add it to your website” then this is where it would go. The neat thing about this customizer is that you can live preview the modifications you make. If you’re happy with how your site looks after modifying it, click the Save & Publish button at the top of the screen to save changes.
Some free and premium WordPress themes come with their own in-built theme customizers. Though most of them work pretty much the same way, the WordPress theme customizer gives you a live preview of how your CSS modifications will look on your site’s front-end.
The key benefits of using the WordPress customizer to add custom CSS to your website is that it’s easy to access and you don’t have to install a plugin. The custom code you add here won’t be removed or overwritten when you update your theme.
METHOD 2: ACTIVE THEME’S STYLE.CSS FILE
You can access your theme’s style.css file directly from your WordPress site’s back-end by navigating to Appearance > Editor from the sidebar menu. You’ll be redirected to the Edit Themes screen.
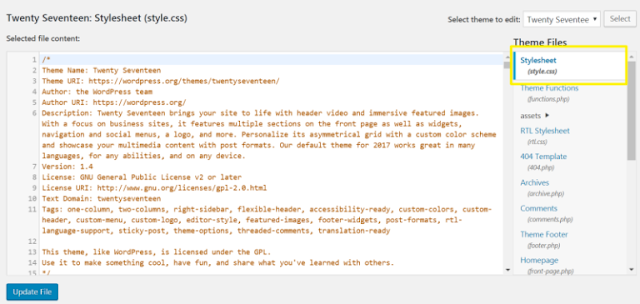
On the right-hand side of the screen, you will see a list of Theme Files. One of the files should be the Stylesheet (style.css) file. And if you click on it, it’ll open up in the code editor. You can edit this file directly from the code editor to make stylistic changes to your website’s active theme.
If you add custom CSS code directly to your active theme’s style.css file, you’ll be able to view its existing CSS code. This makes it easy to see if you need to add a new code snippet of your own or simply modify the existing code.
METHOD 3: CSS PLUGINS
If, for some reason, your active theme doesn’t support the Additional CSS option or if adding custom CSS code to it is difficult to keep track of, you can always use a plugin solution instead. In fact, using a plugin is the most convenient way of editing your theme’s CSS.

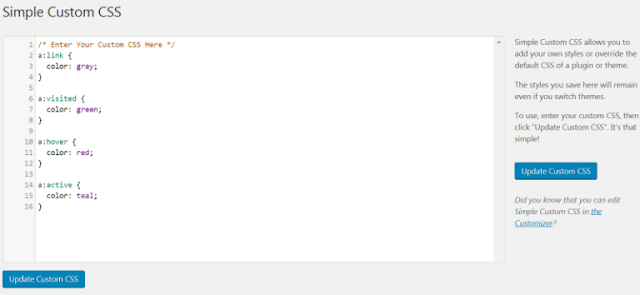
One of the main benefits of using a plugin is that the changes you make to a theme won’t be overridden if you update it. This is because the theme files and the plugin files are stored separately. Here, I will show you how to use Simple Custom CSS plugin to add custom CSS to your WordPress website.
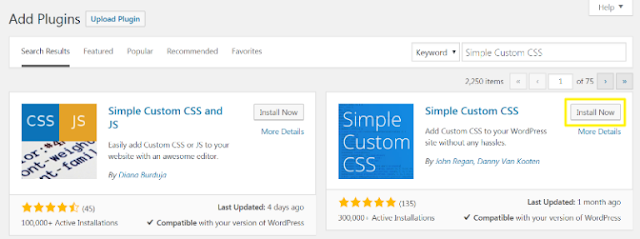
From the WordPress dashboard, navigate to Plugins > Add New to search for and install the Simple Custom CSS plugin.
Once the plugin is installed and activated to your website, go to Appearance > Custom CSS from the WordPress dashboard. You’ll see a simple screen with a text area where you can add custom CSS code snippets. Enter the CSS code and click the Update Custom CSS button to save changes.
If you plan on keeping the changes you make to your site’s CSS even after switching over to a new theme then using a plugin is the best option for you. It gives you the flexibility to apply the same changes to a new theme with minor modifications.
METHOD 4: CHILD THEMES
If you download a theme that you want to make changes to, always do it through a child theme instead of editing the main parent theme. Why? Because if you don’t, you will lose any CSS customizations you make whenever the developer of the theme releases an update for it.
If you don’t already have a child theme, we recommend checking out this post on How to Create a Child Theme in WordPress (And Why You Should).
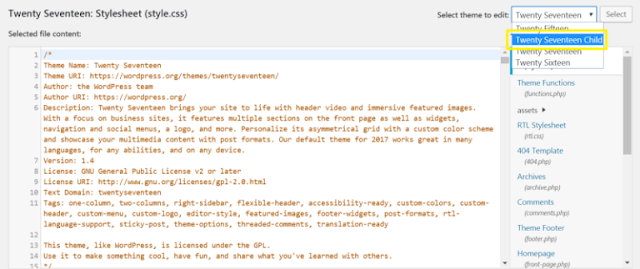
To edit the child theme’s style.css file navigate to Appearance > Editor from the WordPress dashboard. Once you’re on the Edit Themes screen, you will see a list of files on the right side of the screen. Next, select your theme’s corresponding child theme from the Select theme to edit: menu and click the Select button to update the Templates list.
Finally, click on your child theme’s style.css file and it will open in the code editor on the left.
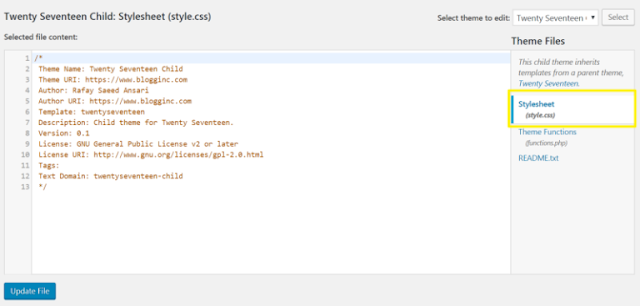
You can add custom CSS code to your child theme’s style.css file directly from here. If you intend on using a specific theme for a long time, you should always activate its child theme on your WordPress website.
Adding custom CSS code to a child theme makes it easy to keep track of all of the CSS you’ve added to your theme. And if you ever need to install your theme to a staging website then you can simply download and install the parent theme and child theme while retaining the custom CSS you’ve added on top of it.
CONCLUSION
Once you get the hang of identifying CSS selectors, adding custom CSS to your WordPress website is pretty easy. If you only have to make a few additions or modifications to your site’s CSS, using the built-in Additional CSS option should do the job.
Let’s quickly recap the four different ways you can add custom CSS to your site:
- Use WordPress’ customizer to add custom CSS code snippets.
- Add custom CSS code to your active theme’s css file using the built-in Editor option.
- Install the Simple Custom CSS plugin if you want to keep the changes separate from your theme files.
- If you intend using a particular theme for a long time; create a child theme and add custom CSS code to its css file.


Post a Comment