
This week, we’ll be creating a simple jQuery gallery that uses the Flickr API to retrieve a list of images from a photo set and display them. We’ll also be using the API to get some additional information about the images and storing it using the HTML5 data-* attributes

THE FLICKR API
To use the API you need to register for an API key, it doesn’t take long and you can start here
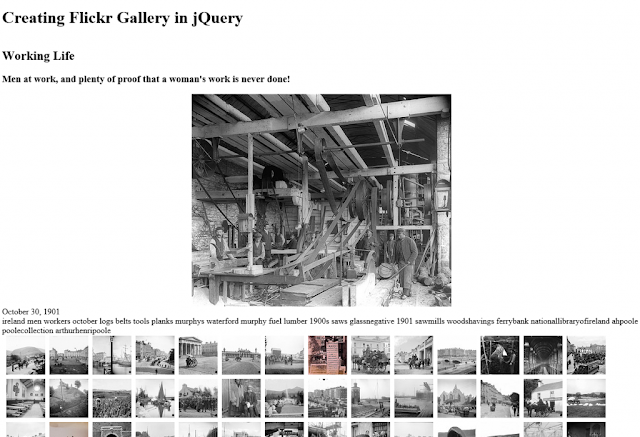
There are 2 methods that we will be using for this tutorial, first we’ll need to get name and description of the specified photo set. To do that we use the flickr.photosets.getInfo method, it has just 2 parameters, the API key and the photo set id. The photo set I am using is from the National Library of Ireland and is title Working Life, you can see the photo set ID (72157626766436507) is easily read from the URL. This set is available under a Commons license. Next up we’ll need to get the list of images in the photo set, to do this we use the flickr.photosets.getPhotos method. This method takes a few extra parameters that allow you to control paging and what information comes back
JQUERY
Just like our last jQuery plug-in, we’ll start off with the basic plug-in template and move on from there.
(function( $ ) {
    $.fn.flickr = function(options) {
        var url = 'http://api.flickr.com/services/rest/?jsoncallback=?';

        var settings = $.extend( {
            'api_key': 'API KEY GOES HERE',
        }, options);

        return this.each(function() {
        });

    };
})( jQuery );
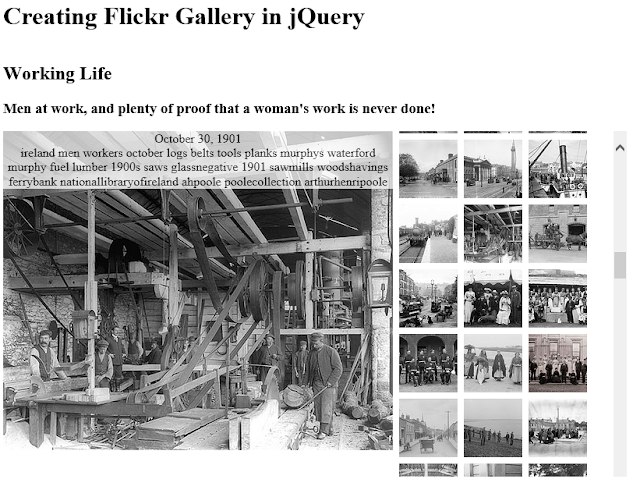
We’re going to make this plug-in completely self contained (except for CSS), so all the user has to provide is an empty div. To enable this, when the plug-in is initialized we will have to add any HTML elements we need.
var gallery = $(this);
gallery.addClass('flickr-gallery');
gallery.append('<h2></h2><h3></h3><div class="viewport"></div><div class="browser"><ul></ul></div><div class="clear"></div>');
Here you can see I am adding some header elements as well as two divs. The “viewport” div is where we will have our main image, and the “browser” div is where we will have our list of thumbnails.
To populate the thumbnail list we’re going to use the jQuery getJSON function. To use the Flickr API all we need to do is specify the API key, the method we are using and the photo set id. We also set the format we want the response to be in.
$.getJSON(url, {
    method: 'flickr.photosets.getInfo',
    api_key: settings.api_key,
    photoset_id: settings.photoset_id,
    format: 'json'
}).success(function(state) {
    gallery.children('h2').html(state.photoset.title._content);
    gallery.children('h3').html(state.photoset.description._content);
}).fail(function(state) {
    alert("Unable to retrieve photo set information");
});
Because we specified the format as ‘json’ we can easily access the values of the response. Here I’m setting the title and description of the photo set in the header tags we added earlier.
Next we want to get the list of images, so this time we will nest the second getJSON function in the success function of our photo set info.
$.getJSON(url, {
    method: 'flickr.photosets.getInfo',
    api_key: settings.api_key,
    photoset_id: settings.photoset_id,
    format: 'json'
}).success(function(state) {
    gallery.children('h2').html(state.photoset.title._content);
    gallery.children('h3').html(state.photoset.description._content);

    $.getJSON(url, {
        method: 'flickr.photosets.getPhotos',
        api_key: settings.api_key,
        media: 'photos',
        photoset_id: settings.photoset_id,
        format: 'json',
        extras: 'url_sq,url_m,date_taken,tags'
    }).success(function(state) {
        var list = gallery.find('ul:first');
        list.html('');

        $.each(state.photoset.photo, function(){
            if(this.isprimary == "1") {
                var viewport = gallery.children('div.viewport');
                viewport.html('');
                viewport.html('<img src="' + this.url_m + '" /><div class="image-info">' + this.title + '<br />' + this.tags + '</div>');
            }
            list.append('<li><img src="' + this.url_sq + '" ' +
                'data-title="' + this.title + '" ' +
                'data-url="' + this.url_m + '" ' +
                ( this.date_taken ? 'data-date="' + this.date_taken + '" ' : '' ) +
                'data-tags="' + this.tags + '" ' +
                '/></li>');
        });

    }).fail(function(state) {
        alert("Unable to retrieve photo set");
    });
}).fail(function(state) {
    alert("Unable to retrieve photo set information");
});
As you can see the getJSON parameters are very similar and when the function returns successfully we use the jQuery each function to loop through all of the images. I am also appending the additional information we want to the img element using the data-* attributes. This allows me to keep all of the data I need next to the correct thumbnail. It also makes it very easy to parse it back out.
The Flickr API also tells me what the primary image for the set is, so I can automatically display this image in our viewport div.
To actually change the image in the viewport, we’ll need to add a click event to the list. We add this to the list and not each list item or image as it creates only one event and is more efficient.
list.on('click', view_image);
The view_image function we are referencing here will determine what element was clicked and then if it’s the thumbnail image, it will parse out the data-* attributes and update the image and headings as appropriate.
function view_image(event) {
    var target = $(event.target);

    if(target.is('img')) {
        var url = target.attr('data-url');
        var cache = new Image();
        cache.src = url;
        var gallery = target.parents('.flickr-gallery:first').children('div.viewport');
        var info = gallery.children('div.image-info');
        var image = gallery.children('img');
        image.fadeOut('slow', function () {
            image.attr('src', url);
            image.fadeIn('slow');
            info.html(target.attr('data-title') + '<br />' + target.attr('data-tags'));
        });
    }
}
There is an additional pieces of logic in the above JavaScript, it’s a quick hack to start the download of the image so that it is available for the animation. This, combined with the fade delay provides a smoother transition for the effect.
var cache = new Image();
cache.src = url;
CSS
For this gallery I have decided on a side by side view. To achieve this, I set the widths on my gallery viewport and browser div elements. I then use the CSS property ‘float’ with the value ‘left’ to move the 2 elements next to each other. It’s always a good idea to reset the float after wards. I have done this by appending an empty div with the class “clear” on it. The “clear” class uses the ‘clear’ property to ensure that the float does not cause any unwanted behavior.
div.flickr-gallery {
    width: 800px;
    height: 550px;
    overflow: hidden;
}

div.flickr-gallery .clear{
    clear: both;
}

div.flickr-gallery > div{
    float: left;
    max-height: 100%;
}

div.flickr-gallery div.viewport{
    width: 500px;
    position: relative;
}

div.flickr-gallery div.browser{
    width: 300px;
    overflow-y: auto;
}

div.flickr-gallery ul{
    list-style: none;
    padding: 0px;
    margin: 0px;
}

div.flickr-gallery ul li{
    float: left;
    width: 75px;
    height: 75px;
    margin-left: 8px;
    margin-bottom: 8px;
}
I also want to have the image title and the tags display over the image. To do this I ensure that the viewport is has a position value of relative, and the image-info div is positioned absolutely. I also adjust the opacity level so that it’s slightly transparent.
div.flickr-gallery div.viewport .image-info {
    position: absolute;
    width: 500px;
    top: 0px;
    text-align: center;
    background-color: #ffffff;
    -ms-filter:"progid:DXImageTransform.Microsoft.Alpha(Opacity=75)";
    filter: alpha(opacity=75);
    -moz-opacity: 0.75;
    opacity: 0.75;
}
I have also set the overflow properties on main div to hidden and the overflow-y property on the browser div to auto so that the thumbnail list stays with in the bounds of the gallery.
USING THE PLUG-IN
To use the plug-in all you need is an empty div and the following jQuery.
<div id="gallery">
</div>
<script type="text/javascript">
$(document).on('ready', function(){
    $('div#gallery').flickr({ photoset_id: '72157626766436507'});
});
</script>
Depending on your Internet connection and the performance of the Flickr API, you may want to add a loading animation to the gallery. It’s as simple as adding an animated gif and then when the final getJSON method returns and is finished parsing hiding it.


Post a Comment